Razvan Savulescu Panther Kallista
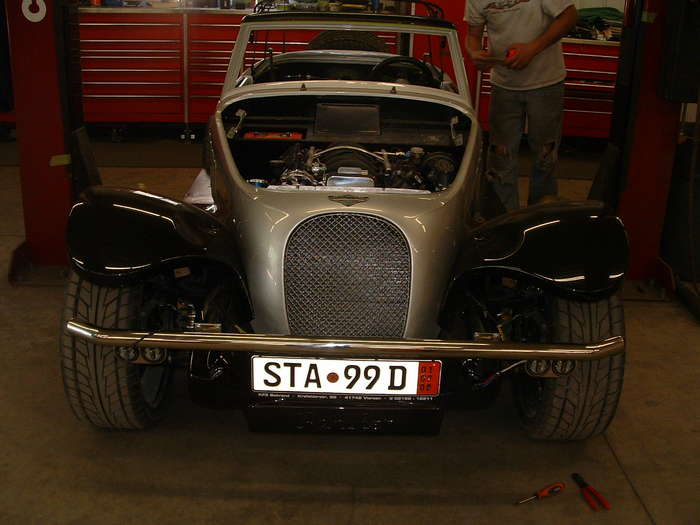
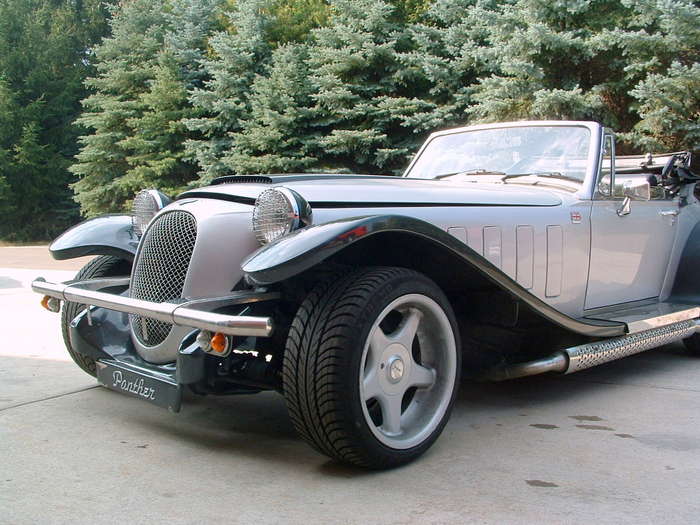
We don't see very many cars like this. There was only about 148 cars like this imported into the US. This one came all the way from Romania for a HRF transformation at our Minnesota hot rod shop. Check it out.
We are adding a LS3 with a 6-speed transmission that makes about 500 Horsepower. Big Wilwood brakes at all 4 corners, 18-inch wheels, and completely customizing this car. It will have a power top, power windows, navigation, and be down right insane to drive.
View fullsize
![1988 Panther Kallista fresh out of customs...]()

1988 Panther Kallista fresh out of customs...
View fullsize
![Another photo of the car in its original form]()

Another photo of the car in its original form
View fullsize
![Note the side pipes we will be upgrading them to a much larger sidepipe that comes out threw the frame much higher to give it a more custom look.]()

Note the side pipes we will be upgrading them to a much larger sidepipe that comes out threw the frame much higher to give it a more custom look.
View fullsize
![Right now it has 16 inch rims it will have 18 inch rims and a much larger tire when we are done.]()

Right now it has 16 inch rims it will have 18 inch rims and a much larger tire when we are done.
View fullsize
![The top is a manual top we will be converting it to power]()

The top is a manual top we will be converting it to power
View fullsize
![The interior isgoing to be alot different as well the shifter and ebrake will be further back and the seat with be much more comfortable with bolsters and custom made leather seats.]()

The interior isgoing to be alot different as well the shifter and ebrake will be further back and the seat with be much more comfortable with bolsters and custom made leather seats.
View fullsize
![The top protrudes on the outside of the body this will be changed so it tucks in the body the windshield frame will also be custom fabricated to make it more rounded at the top.]()

The top protrudes on the outside of the body this will be changed so it tucks in the body the windshield frame will also be custom fabricated to make it more rounded at the top.
View fullsize
![We will keep all the factory emblems the entire body will be stripped and all body work redone the body is made of aluminum]()

We will keep all the factory emblems the entire body will be stripped and all body work redone the body is made of aluminum
View fullsize
![Here you can see the car as it being dismantled]()

Here you can see the car as it being dismantled
View fullsize
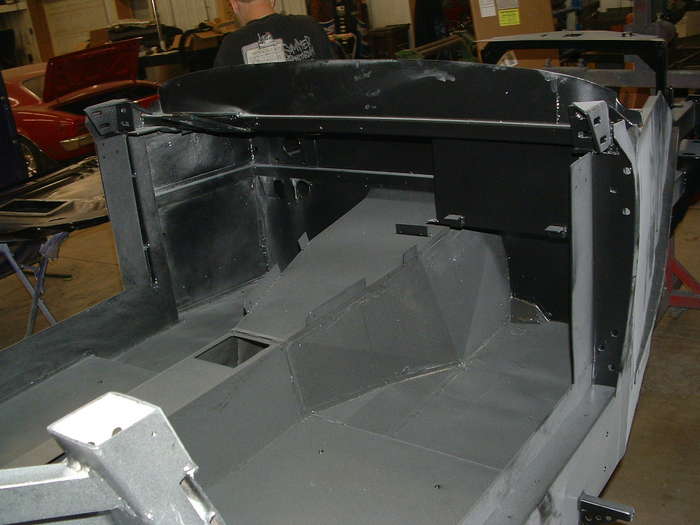
![Once the motor was removed it was determined that the best way to make the motor fit was to move the firewall back to make a little more room. This will not take up an foot room.]()

Once the motor was removed it was determined that the best way to make the motor fit was to move the firewall back to make a little more room. This will not take up an foot room.
View fullsize
![Here is a good shot of the old firewall.]()

Here is a good shot of the old firewall.
View fullsize
![Not much room there for an LS3 but we will shoe horn it in there.]()

Not much room there for an LS3 but we will shoe horn it in there.
View fullsize
![This shows the inside of the car you can see the old shifter hole this will be welded up and a new one made a few inches back]()

This shows the inside of the car you can see the old shifter hole this will be welded up and a new one made a few inches back
View fullsize
![The running boards are riveted in place they have to be removed to remove the body.]()

The running boards are riveted in place they have to be removed to remove the body.
View fullsize
![The rearend is very small I think my golf cart might have a larger one in it. We will replace it with a custom built 12 bolt]()

The rearend is very small I think my golf cart might have a larger one in it. We will replace it with a custom built 12 bolt
View fullsize
![The car was yellow and black in its past life we will be going to red and black.]()

The car was yellow and black in its past life we will be going to red and black.
View fullsize
![This shows and area above the firewall that was covered witha piece of ABS plastic no wonder the car had so much road noise we will make a steel panel to replace it]()

This shows and area above the firewall that was covered witha piece of ABS plastic no wonder the car had so much road noise we will make a steel panel to replace it
View fullsize
![The radiator may have to move forward to make room for the motor. We will see.]()

The radiator may have to move forward to make room for the motor. We will see.
View fullsize
![This shows the frame of the car it is way to thin to take the new HP we will have to reinforce some areas and make a new transmission mount and motor mounts.]()

This shows the frame of the car it is way to thin to take the new HP we will have to reinforce some areas and make a new transmission mount and motor mounts.
View fullsize
![Theres that tiny rearend and note the old gas tank]()

Theres that tiny rearend and note the old gas tank
View fullsize
![We will change the springs and shocks to adjustable coilovers]()

We will change the springs and shocks to adjustable coilovers
View fullsize
![The rear suspension will also get reworked to handle the new motor it will get upgraded to hotchkis rear trailing arms.]()

The rear suspension will also get reworked to handle the new motor it will get upgraded to hotchkis rear trailing arms.
View fullsize
![Another photo of the bottom here you see the old transmission mount]()

Another photo of the bottom here you see the old transmission mount
View fullsize
![The front suspension will get coilovers new brakes and possibly a new kframe with upgraded Aarms]()

The front suspension will get coilovers new brakes and possibly a new kframe with upgraded Aarms
View fullsize
![The front end is out of a Ford Cartina which was released in the mid 70s.]()

The front end is out of a Ford Cartina which was released in the mid 70s.
View fullsize
![Here is the panther with the body removed not much left.]()

Here is the panther with the body removed not much left.
View fullsize
![This shows where the new fuel tank will fit we will raise it up to where the filler neck is then it will also move forward for more fuel capacity.]()

This shows where the new fuel tank will fit we will raise it up to where the filler neck is then it will also move forward for more fuel capacity.
View fullsize
![The dash was really poorly installed the braces were made out of aluminum and were way to thin.]()

The dash was really poorly installed the braces were made out of aluminum and were way to thin.
View fullsize
![We will be replacing the steering column with a tilt IDIDIT column.]()

We will be replacing the steering column with a tilt IDIDIT column.
View fullsize
![These side panels will be removed to make room for the sidepipes.]()

These side panels will be removed to make room for the sidepipes.
View fullsize
![The new LS3 very nice.]()

The new LS3 very nice.
View fullsize
![This shows the new clutch installed.]()

This shows the new clutch installed.
View fullsize
![New 6 speed transmission]()

New 6 speed transmission
View fullsize
![The front body panel after removal.]()

The front body panel after removal.
View fullsize
![Here is the rear body panel after removal.]()

Here is the rear body panel after removal.
View fullsize
![We will be reusing the grill and we will try to make the side gills functional if there is enough room]()

We will be reusing the grill and we will try to make the side gills functional if there is enough room
View fullsize
![Here the firewall is removed and the new motor and transmission are mocked up.]()

Here the firewall is removed and the new motor and transmission are mocked up.
View fullsize
![You can see the transmission just barely fits the transmission tunnel.]()

You can see the transmission just barely fits the transmission tunnel.
View fullsize
![This shows the shifter in its new location.]()

This shows the shifter in its new location.
View fullsize
![Boy does the motor look big in this picture but it does fit]()

Boy does the motor look big in this picture but it does fit
View fullsize
![here is a shot from the front it looks like the radiator might have enough room in its stock location.]()

here is a shot from the front it looks like the radiator might have enough room in its stock location.
View fullsize
![After the motor is removed from mock up we can now make the new firewall]()

After the motor is removed from mock up we can now make the new firewall
View fullsize
![New cross braces installed to hold the firewall.]()

New cross braces installed to hold the firewall.
View fullsize
![Here the old fuel tank cover has been cut out to make room for the new one. The new tank will be stainless steel and the fuel pump will be internal]()

Here the old fuel tank cover has been cut out to make room for the new one. The new tank will be stainless steel and the fuel pump will be internal
View fullsize
![The seatbelt towers will have to be shortened to make room for the top]()

The seatbelt towers will have to be shortened to make room for the top
View fullsize
![Here the new firewall is in place and has been welded in.]()

Here the new firewall is in place and has been welded in.
View fullsize
![Here you see the firewall after it has been ground it looks much better than the original with out all the extra holes.]()

Here you see the firewall after it has been ground it looks much better than the original with out all the extra holes.
View fullsize
![Here we mocked up thepower top linear actuators in the end we went with a shorter one but we did get the arms fabricated and new the angle were right]()

Here we mocked up thepower top linear actuators in the end we went with a shorter one but we did get the arms fabricated and new the angle were right
View fullsize
![Inside the car after the firewall is installed and the old shifter hole has been welded up.]()

Inside the car after the firewall is installed and the old shifter hole has been welded up.
View fullsize
![Here you see the rams in action and the modification made to the seat belt tower]()

Here you see the rams in action and the modification made to the seat belt tower
View fullsize
![This shows the brackets that were removed under the car and the thicker frame rail being installed.]()

This shows the brackets that were removed under the car and the thicker frame rail being installed.
View fullsize
![This is a finished frame railwe have added 1/8 steel to the entire rail to stiffen it up the next couple pictures show the other one without the steel.]()

This is a finished frame railwe have added 1/8 steel to the entire rail to stiffen it up the next couple pictures show the other one without the steel.
View fullsize
![Here is the finished frame rail.]()

Here is the finished frame rail.
View fullsize
![this is before adding the 1/8 steel these rails are paper thin]()

this is before adding the 1/8 steel these rails are paper thin
View fullsize
![The new rearend blasted and brackets stripped back]()

The new rearend blasted and brackets stripped back
View fullsize
![The tub with the old rearend removed]()

The tub with the old rearend removed
View fullsize
![Rear tub of the car with new frame rails installed]()

Rear tub of the car with new frame rails installed
View fullsize
![LS3 with the transmission installed and headers installed, and the new motor mounts]()

LS3 with the transmission installed and headers installed, and the new motor mounts
View fullsize
![Starter installed and ready to fit for frame mounts and trans crossmember]()

Starter installed and ready to fit for frame mounts and trans crossmember
View fullsize
![The new motor installed in car with new frame mounts]()

The new motor installed in car with new frame mounts
View fullsize
![A good shot of the bottom that shows the motor mounts and frame rail modifications.]()

A good shot of the bottom that shows the motor mounts and frame rail modifications.
View fullsize
![new transmission crossmember installed.]()

new transmission crossmember installed.
View fullsize
![The new motor is massive in comparison to the old one but fits very nice in this little car.]()

The new motor is massive in comparison to the old one but fits very nice in this little car.
View fullsize
![A shot of the bare tub doesn't look like much here.]()

A shot of the bare tub doesn't look like much here.
View fullsize
![Here is the tub just before getting sandblasted.]()
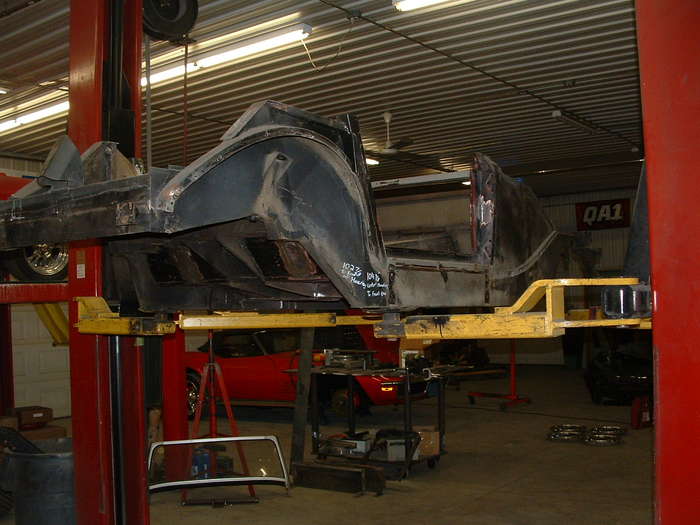
Here is the tub just before getting sandblasted.
View fullsize
![Here the old suspension mounts have been removed the rear suspension was mounted to very thin sheetmetal this will have to be upgraded]()
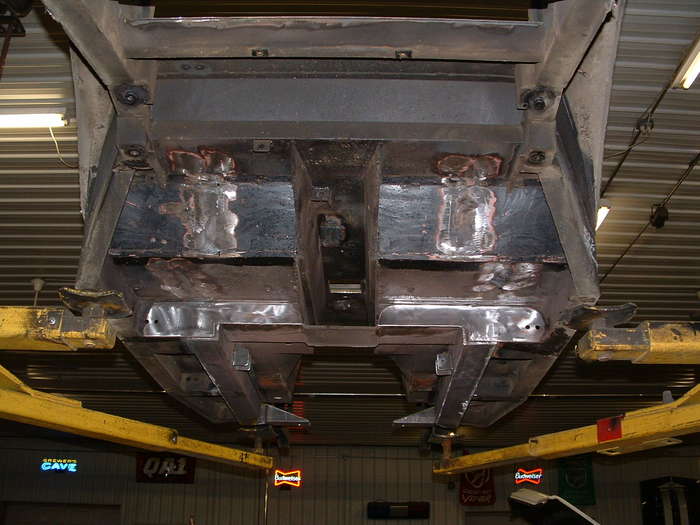
Here the old suspension mounts have been removed the rear suspension was mounted to very thin sheetmetal this will have to be upgraded
View fullsize
![Here the new crossmember is installed with the rack and pinion mounts.]()

Here the new crossmember is installed with the rack and pinion mounts.
View fullsize
![Note the hole in the new front frame rail this will have to be boxed in for appearance purposes]()

Note the hole in the new front frame rail this will have to be boxed in for appearance purposes
View fullsize
![The upper part of the tub is where the body and radaiator mounts this will have to be kept to reattach these items]()

The upper part of the tub is where the body and radaiator mounts this will have to be kept to reattach these items
View fullsize
![Here you can see the new rear suspension mounts installed we also had to add 1/8 inch steel to attach the suspension mounts to and box the old frame rails]()

Here you can see the new rear suspension mounts installed we also had to add 1/8 inch steel to attach the suspension mounts to and box the old frame rails
View fullsize
![This shows the new suspension mounts and the boxed frame rails this will be much stronger and more rigid]()

This shows the new suspension mounts and the boxed frame rails this will be much stronger and more rigid
View fullsize
![On the left side of the picture you can see the driveshaft tunnel brace has been lowered about an inch to make room for the driveshaft]()

On the left side of the picture you can see the driveshaft tunnel brace has been lowered about an inch to make room for the driveshaft
View fullsize
![Another picture of the rear frame and all its reinforcement.]()

Another picture of the rear frame and all its reinforcement.
View fullsize
![Here you can see the extra welds to the floor pans they were originally tack welded from the factory this continuos weld will add strength and rigidity]()
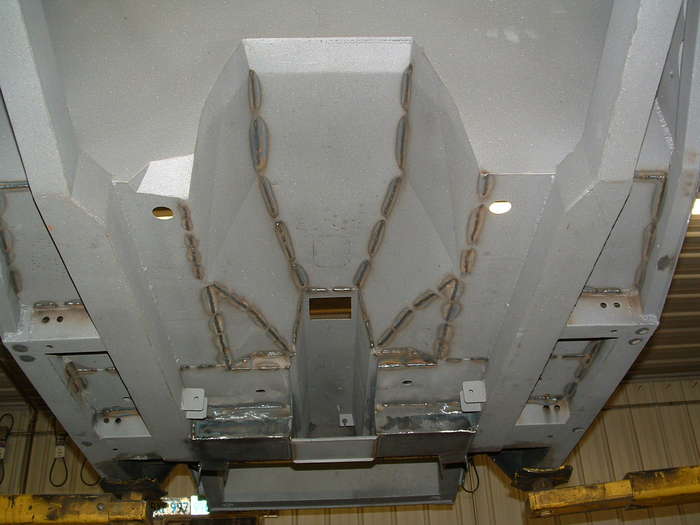
Here you can see the extra welds to the floor pans they were originally tack welded from the factory this continuos weld will add strength and rigidity
View fullsize
![Lower shot of the new front frame section this will hold the new Aarm suspension and rack]()

Lower shot of the new front frame section this will hold the new Aarm suspension and rack
View fullsize
![Here the battery box is installe d and we are making the top of the firewall this was made out of ABS and caused alot of interior noise]()

Here the battery box is installe d and we are making the top of the firewall this was made out of ABS and caused alot of interior noise
View fullsize
![Here the master cylinder and booster are installed with custom made brackets]()
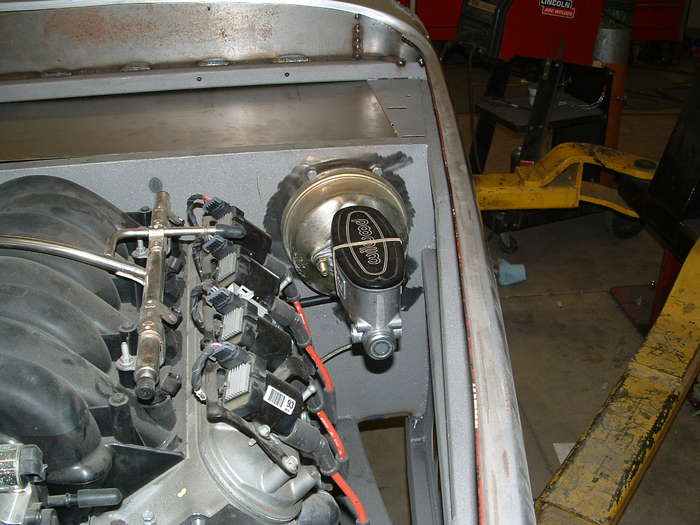
Here the master cylinder and booster are installed with custom made brackets
View fullsize
![Here you can see the extension to the body that was made of ABS]()
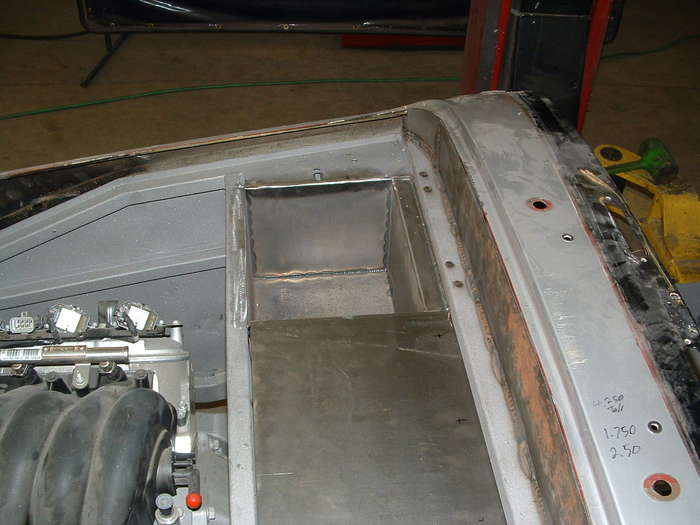
Here you can see the extension to the body that was made of ABS
View fullsize
![Here are the emergency brake mounts installed.]()

Here are the emergency brake mounts installed.
View fullsize
![Here we have modified the pedal assembly to run the new clutch master cylinder]()

Here we have modified the pedal assembly to run the new clutch master cylinder
View fullsize
![Here the mounts have been made to mount the heater box in its new location. Youy can also see the main computer mounts on the battery box]()

Here the mounts have been made to mount the heater box in its new location. Youy can also see the main computer mounts on the battery box
View fullsize
![here is the new fuse panel mounts installed it is important to make all these mock ups to fit everything in its new location.]()

here is the new fuse panel mounts installed it is important to make all these mock ups to fit everything in its new location.
View fullsize
![These panels will be covered with leather and the middle water fall will have woodgrain and a 7 inch navigation screen]()

These panels will be covered with leather and the middle water fall will have woodgrain and a 7 inch navigation screen
View fullsize
![This shows the fresh air inlet that goes to the bottom of the hood]()

This shows the fresh air inlet that goes to the bottom of the hood
View fullsize
![another angle of the firewall with all the accessories removed it is much cleaner than the old one that had the fuse panel, wiper motor mounted to it.]()

another angle of the firewall with all the accessories removed it is much cleaner than the old one that had the fuse panel, wiper motor mounted to it.
View fullsize
![This shows off the waterfall very well. as stated before this will be covered with woodgrain as well as the dash with new metric gauges]()

This shows off the waterfall very well. as stated before this will be covered with woodgrain as well as the dash with new metric gauges
View fullsize
![threw the old dash holes you can see the wiper motor in its new location.]()

threw the old dash holes you can see the wiper motor in its new location.
View fullsize
![1988 Panther Kallista]()

1988 Panther Kallista
View fullsize
![1988 Panther Kallista]()

1988 Panther Kallista
View fullsize
![Here you can see the old wheels loaded in the transporter I hope they make the trip all the way home and don't get stolen.]()

Here you can see the old wheels loaded in the transporter I hope they make the trip all the way home and don't get stolen.


